
Grow AI Overview
Clio Grow’s AI solution helps you capture, qualify, and convert more leads so you can focus on what you do best.
Key Features
- 24/7 Website chat: Capture leads and gather essential intake details instantly, even after hours.
- Smart lead assessment: Prioritize high-value prospects with fit-scoring based on your firm’s history.
- Conflict checks: Instantly flag potential conflicts for your review.
- Automated follow-ups: Automate reminders for signatures, forms, and appointments.
- Email campaigns: Stay top-of-mind with automated outreach to past clients.
Set hiring Targets with Grow AI
Grow AI can act as your intake assistant by analyzing your client intake data along with revenue-per-matter information to suggest hiring targets for your firm. Grow AI acts as your assistant and “bills” you for each client you hire successfully with Grow AI’s help.
Cost controls
Once you reach your target, Grow AI will pause website chat and no longer offer suggestions that push for hiring matters. This not only helps you keep your bill manageable, but also allows you to consider and plan for the workload that your firm is able to take on. When your target renews at the start of the next billing cycle, Grow AI will resume operations.
You can set and subsequently edit the target in your Clio Grow settings.
To set your hiring target:
- In Clio Grow, go to Settings > Subscription.
- Click Set hiring target.
- Update your target per month amount.
- Click Save target.
Your Grow AI panel will now show a summary of your current performance in relation to your target.
To edit your hiring target:
- In Clio Grow, go to Settings > Subscription.
- Click the edit icon (pencil).
- Update your target per month amount.
- Click Save target.
Your Grow AI panel will now show a summary of your current performance in relation to your target.
Add website chat tool to your website
Grow AI’s website chat is an efficient, 24/7 self-service option for new client engagement and intake that you can incorporate on your firm’s website. The chat tool can collect essential preliminary information from prospective clients, ensuring your team has the necessary details before any direct consultation. The information is funnelled into your lead intake process where Grow AI continues to assist you by providing summary information and key details about leads so that you can make informed decisions about which leads to accept or refer to another firm. This feature streamlines your intake process, improving efficiency and ensuring consistency in data collection.
There are three options for adding the website chat tool to your website.
Option 1:
If your website was created using Clio Grow, you can add the website chat tool to it as follows:
- In Clio Grow, go to Settings > Website chat.
- In the Configuration section, toggle Add chat widget to your Clio Grow website to on.
Option 2:
To manually add the website chat tool to your existing website not created using Clio Grow, follow the instructions below.
- In Clio Grow, go to Settings > Website chat.
- In the Configuration section, click Add website.
- Paste the URL of your website where you want to add the chat tool, then click Save website.
- In the Configuration section, click View embed code.
- Click Copy embed code to copy the code to your clipboard.
- Log into your website builder or web content management system’s dashboard.
- Paste the copied code to the relevant element or page on your website. Do not add add the copied code to your website more than once.
- If you have built your website pages from scratch, you can paste the copied code inside the
<body>tag of a page’s html. It is typical for a website chat to appear near a webpage’s html header elements, so you’ll likely paste the code nearer to the top of the<body>tag. We recommend placing it as high up in the website hierarchy as possible to ensure the website chat loads quickly. - If you are using a content management system like WordPress, you can usually use existing functionality or extensions/add-ons to add the website chat tool to your header.
- If you have built your website pages from scratch, you can paste the copied code inside the
- You can preview the changes and then publish your website to enable the chatbot.
Once it has been added, learn how to Customize the website chat tool to suit your needs.
If you run into any issues with setting up the Website chat tool, refer to the troubleshooting guide below.
Option 3:
If you use WordPress to manage your website, you may have access to the Clio Grow WordPress plugin (in beta).
- In Clio Grow, click Settings > Website Chat.
- In your Configuration Section, select the WordPress plugin option, and then click Add plugin.
- Install the plugin in WordPress.
- Once installed, in WordPress go to the plugin and click Settings.
- Add your domain, then click Save settings.
Troubleshoot website chat tool
The information below provides explanations and solutions to the most common issues when adding the website chat tool to your website.
Chat does not appear in website
After you have followed the steps and published your website, the chat does not appear. There are two main reasons that this can happen.
- Your browser has cached (saved) some files on your local machine to reuse to view your webpage. This means that the webpage you are currently viewing does not have the most recent data from the server (e.g., WordPress or another content management system you are using).
Solution: Hard refresh your webpage in your browser:- For Windows / Linux: Press Ctrl + Shift + R while viewing your website
- For Mac: Press Cmd + Shift + R while viewing your website
- Your server (e.g., WordPress or another content management system you are using) may take some time to rebuild the pages that you updated.
Solution: You can wait a few minutes, or you can manually force the rebuild by clearing your cache on the server side. This looks different depending on the content management system you are using.Tip: Search the internet for “Clear cache [your content management tool]” for information on your scenario.
Chat icon overlaps other element or vice versa
Use the zIndex property in the embed code snippet to specify if your chat tool needs to be in front of or behind other html elements in your page.
In the code that you copied, find the following line of code:
script.onload = function GrowChatbotInit() {
GrowChatbot.init({ growSubdomain: growSubdomain });
Modify this line by adding the zIndex parameter, for example
script.onload = function GrowChatbotInit() { GrowChatbot.init({ growSubdomain: growSubdomain, zIndex: "5" });
An html element with a higher zIndex will be placed in front of other html elements with lower zIndex values. Adjust the value to suit your needs.
Customize website chat tool
To customize the information your website chat collects from prospective clients, follow these steps:
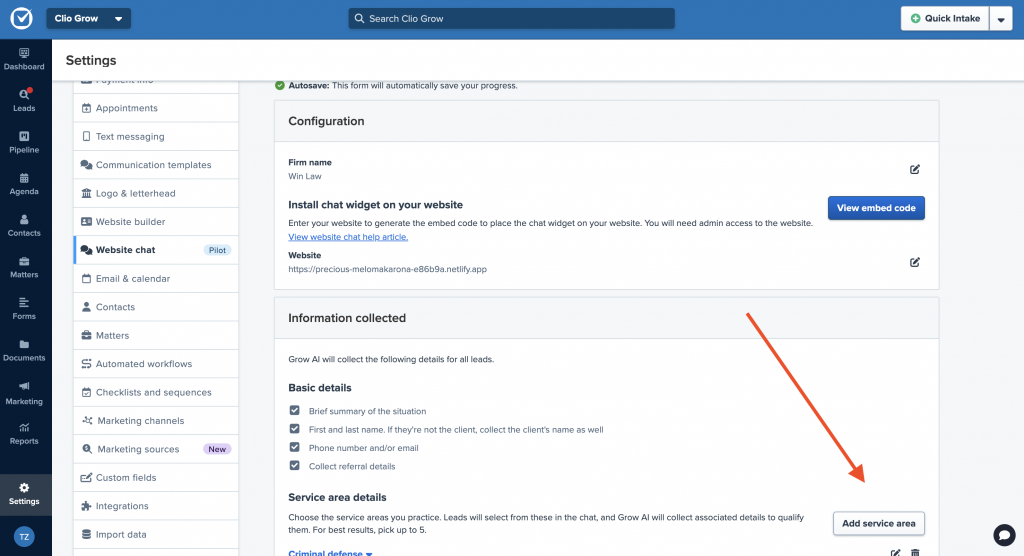
- In Clio Grow, go to Settings > Website chat.
- In the Information collected section, use the check boxes to select which basic details the chat tool should collect from a prospective client.
- In the Information collected section, add the service area(s) you want the chat tool to gather information about from a prospective client.
-
- Click Add service area to add additional areas that you want the chat tool to collect information about.
- 2. In the modal, select the Practice area category, Service area, and add a Lead-friendly label.
Note: The Lead-friendly label appears at the top of your chat tool when a prospective client opens it. Make sure that you provide a label that allows your clients to easily understand what legal services your firm specializes in.
3. Click Add service area.
Repeat these steps until you have added all the service areas you specialize in.
-
- For each service area you added, specify the specific details you want the tool to gather information about. Expand the service area to view the default service-area-specific questions provided by Grow AI.
- Click Collect additional details to select any other information you want to collect.
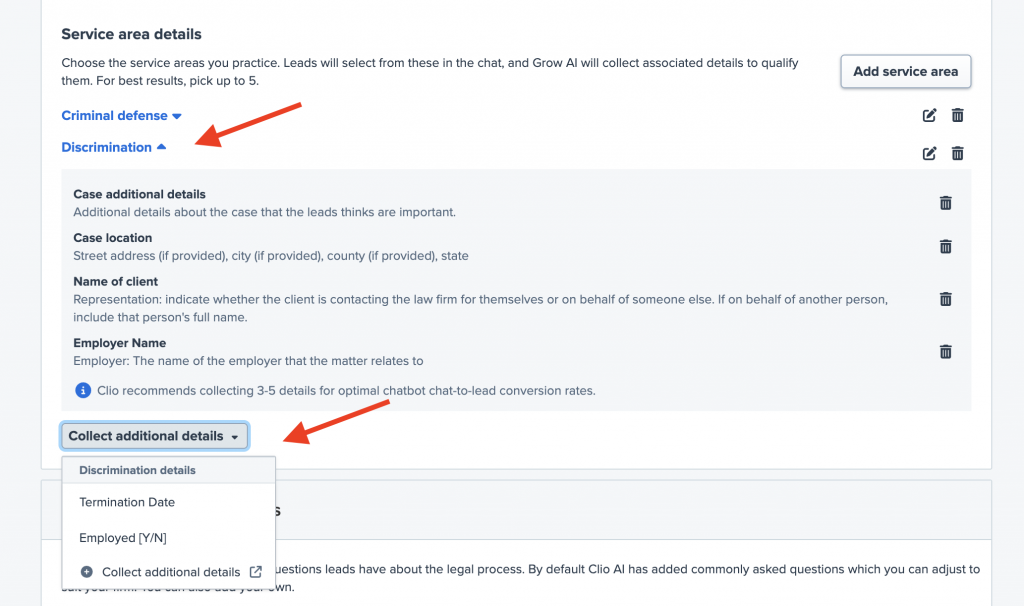
- Click Collect additional details to select any other information you want to collect.
You can also use the bin (delete) icon next to a service area to remove it from the chat, use the edit (pencil) icon next to a service area to choose a different Practice area category, Service area, and change the Lead-friendly label.
To customize the answers your website chat provides to prospective clients, follow these steps:
- In Clio Grow, go to Settings > Website chat.
- Under Frequently asked questions, click Update questions.
- To edit an existing question, click the edit button, make your changes, then click Save.
- To add a new question, click Add questions.
Set up Google Analytics integration for Website Chat
To understand how people are using your Website Chat, you can set up a Google Analytics integration. The integration allows you to track how many leads you can attribute to the Website Chat interaction.
- In Clio Grow, go to Settings > Website chat.
- In the Google Analytics integration section, click Add integration.
- Fill the modal.
- Learn how to find the Measurement ID in Google Analytics.
- Learn how to find the API secret in Google Analytics.
- Click Save integration.
Once this integration is enabled, the following events are sent to Google Analytics.
- chatStarted: When a conversation is initiated with the Website Chat.
- chatLead: When a Clio Grow Lead is created from the Website Chat.
- If you run Google Ads, the chatLead event automatically connects the generated lead back to the originating ad click, enabling you to see how your Google Ads spending translates directly into leads and conversions.
To edit the integration:
- In Clio Grow, go to Settings > Website chat.
- In the Google Analytics integration section, click the pencil (edit) icon.
- Update the modal, then click Save integration.
Use Grow AI to assist with lead intake
To assist you with your lead intake processes, Grow AI will analyze lead details to create summary information along with an assessment of client fit. Additionally, for leads captured through Grow AI’s website chat, it allows you to quickly review any details, such as contact details and the time the lead was created, and you can click View transcript to view the original chat exactly as it occurred.
To provide an assessment of client fit, Grow AI analyzes the information provided by your prospect. For example, Grow AI might assess if the lead’s needs align with the services your firm typically provides, if the lead’s location is in an area serviced by your firm, or if there is a high likelihood of a conflict of interest. Click Review assessment to view the details that Grow AI used to produce its rating. You can change Grow AI’s assessment label by clicking the down arrow next to the rating and selecting a different rating category.
Activate email marketing automated campaigns
If you use email marketing in Clio Grow, Grow AI features automated email campaigns to help you stay top of mind. For example, a birthday campaign will send congratulatory birthday emails to your contacts with dates of birth on file. Once you activate an automated email campaign, you cannot delete or edit it in order to preserve data about any emails that were already sent as part of the campaign. If you want to change an automated campaign you can pause your existing campaign and create a new one.
Create campaign
- In Clio Grow, click the main Marketing tab.
- In the Premade campaigns section click View campaign for one of the suggested campaigns, or click Explore more for additional options.
- Click Create campaign.
- Optional: Edit the campaign.
- Edit the campaign name. Refer to step 2 in Create an Email marketing campaign for details.
- Edit the automation rules. Depending on the type of campaign, the trigger for the automation can be
- the date that the matter was closed or
- the contact’s date of birth (for birthday campaigns).
Set the amount of time to wait after the trigger condition is met before the email should be sent to a contact.
- Modify the recipient list as needed. Refer to step 3 in Create an Email marketing campaign for details.
- Edit the email content. Refer to step 4 in Create an Email marketing campaign for details.
- Once you have completed all details, click Activate campaign, then confirm this action by clicking Activate campaign again.
Once activated, birthday campaigns will send emails to recipients at 9:00 AM PDT on their birthday, and other automated campaigns will send emails to recipients at 9:00 AM PDT on the first business day after the trigger condition is met and the amount of time to wait has lapsed. To review the emails sent with automatic campaigns, view the Email marketing recipient report for the campaign.
Pause or reactivate campaign
You can also pause and reactivate automated email campaigns. To pause a campaign:
- In Clio Grow, click the main Marketing tab.
- For the (active) campaign you want to pause, click Actions > Pause campaign.
- In the modal, click Pause campaign again to confirm.
To reactivate a campaign:
- In Clio Grow, click the main Marketing tab.
- For the campaign you want to pause, click Actions > Activate campaign.
- In the modal, click Activate campaign again to confirm.
Deactivate or reactivate Grow AI
To turn Grow AI off or on:
- In Clio Grow, click Settings > Subscription.
- In the section “Grow AI”, click Deactivate Grow AI or Reactivate Grow AI (whichever one is applicable).
- In the modal, confirm your choice.
Connect/disconnect email account to Clio Grow
Connect email account to Clio Grow
You can connect your Gmail, Outlook, or Exchange email account to Clio Grow to ensure that all email communications with contacts stored in Clio Grow are automatically logged within the contact and/or matter file in Grow. This integration centralizes your entire conversation history in a single, searchable location and ensures team-wide visibility on communications.
To connect your email inbox to Clio Grow:
- In Clio Grow, go to Settings > Email & calendar.
- In the card Automatically file your emails and attachments, click Connect your Inbox. If you have already connected an email inbox, click Connect another Inbox.
- From the menu, select your email service provider.
- Follow the prompts to connect your account. You may be prompted to
- sign into your email account, and/or
- accept the required permissions Clio needs to access your email account.
Once connected, any new emails received from contacts that exist in Clio Grow will be logged. Emails received prior to connecting your inbox will not be synced to Clio Grow.
Email to intake
Once you connect your email account to Clio Grow and if your firm uses Grow AI, you can allow the AI to scan your emails to identify any emails that are leads. It will then process these emails by extracting relevant fields and details and send these to your Grow Lead Inbox. By adding a helpful summary and Lead score, Grow AI allows you to quickly determine which leads to add or refer out. Grow AI will even suggest relevant next steps which you can choose to follow or ignore.
To allow Grow AI to scan your emails, follow these steps:
- In Clio Grow, go to Settings > Email & calendar.
- In the card Automatically file your emails and attachments, for the relevant email inbox you previously connected, toggle the Send new lead emails to Leads inbox to on.
Disconnect email account from Clio Grow
- In Clio Grow, go to Settings > Email & calendar.
- In the card Automatically file your emails and attachments, click Disconnect for the relevant inbox.
- In the modal, click Disconnect to confirm.