For modern law firms, data security is paramount. To keep client and firm data secure, lawyers need take careful precautions and create thoughtful security policies—and it doesn’t matter whether they’re on a PC or a Mac.
Below are 9 tips to increase security on your Macs, shared with me by our Principal Systems Administrator at GlobalMac IT, Tobias Morrison. These apply whether you’re a solo attorney or large team of Mac-wielding attorneys and support staff.
The breakdown below is not comprehensive, but it’s a great place to start—it’s purposefully straightforward and uncomplicated, so that anyone reading this can work through it as a checklist.
The best way to apply these points is to build them into a standard security policy that your firm adheres to. If such a policy does not exist yet, create one. Every firm needs a standard policy and process for enabling the security features on a Mac, so that applications are consistent across the firm.
If you’re uncertain about whether any of the recommendations below are currently being implemented, you should audit all systems in the firm to ensure that they are. The right system administrator with the right tools can automate all these recommendations, as we have in our solution for our clients.
1. Enable FileVault
Requiring a password to get into your laptop does not mean that your files are completely protected. Many tech-savvy individuals could still open your computer, remove the drive, plug it into another computer, and have full access to its data.
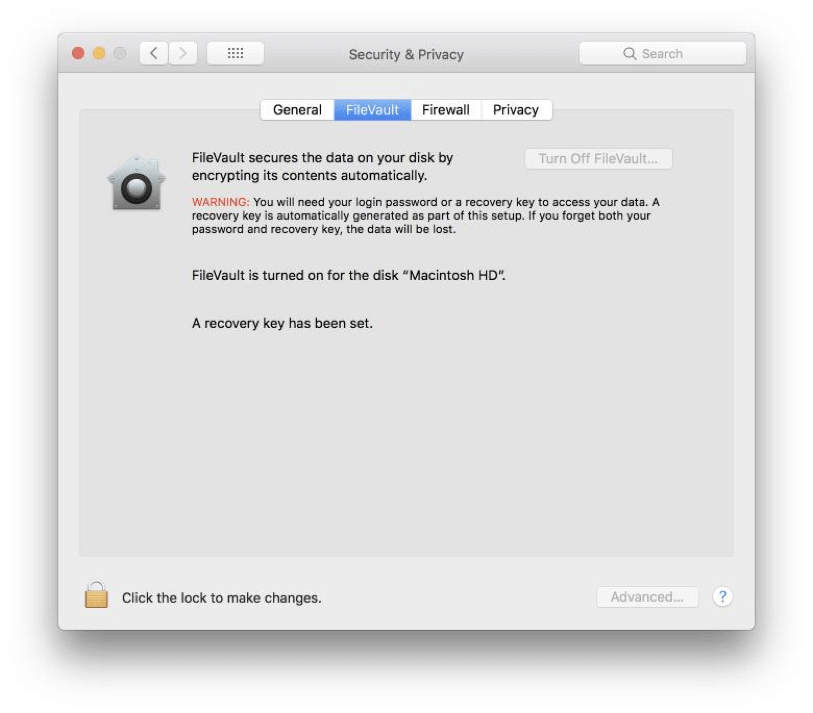
With FileVault, as soon as your Mac shuts down, its entire drive is encrypted and locked up—the drive’s contents are only unlocked when an authorized user turns on the Mac and logs in.
Since October 2014, as of Yosemite 10.10, Apple has enabled FileVault as the default setting. To check if it is enabled, go to System Preferences, then Security & Privacy, and click on the FileVault tab. If FileVault is not yet enabled, enable it and store the Recovery Key.
2. Lock your computer screen
If you often leave your computer on and walk away from it to refill your coffee or use the restroom, you should be locking your screen every single time. Locking the screen leaves everything running and exactly as it is, but turns your screen blank (or with your screensaver of choice)—so that anyone who wants to use your computer needs to enter a password to get in.
This way, prying eyes won’t see sensitive information up on your screen as they walk by your desk.
3 Ways to manually lock your screen
Get into the habit of locking your screen every single time you walk away from your computer. Here’s how to do it:
1. One of the easiest ways is to click on the Apple in the menu bar at the top right corner of your screen and choose “Lock Screen.”
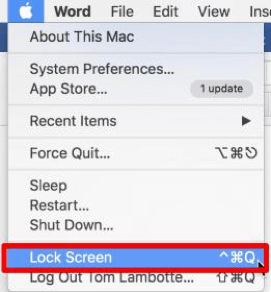
2. If you like keyboard shortcuts, lock your screen with: Command + Control + Q
3. If you have a new MacBook Pro that includes a TouchBar, my preferred method is to add the lock button to your TouchBar. Go to System Preferences > Keyboards. Click on “Customize Control Strip ….” Look for the Screen Lock icon and drag it to your TouchBar—now it’s a quick click away. You also have the added bonus option of using Touch ID with these systems, so unlocking is a breeze.
Set your screen to lock after a short timer
A timer automates the screen-locking process, helping to some degree, but only should be used as a backup. This requires a two-step process to enable. First, go to System Preferences > Desktop & Screensaver, and click on the Screen Saver tab. Set your desired “Start after” time from the dropdown.
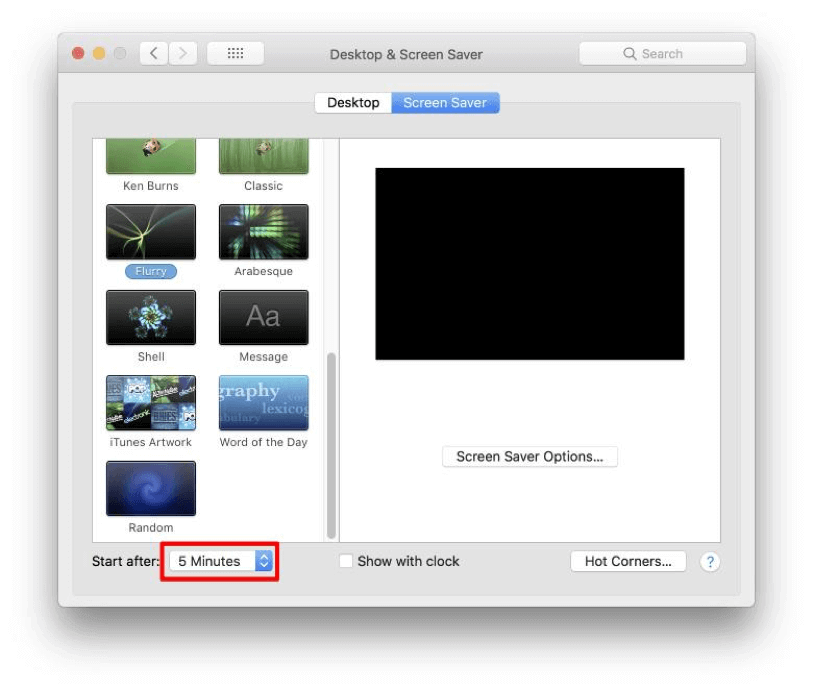
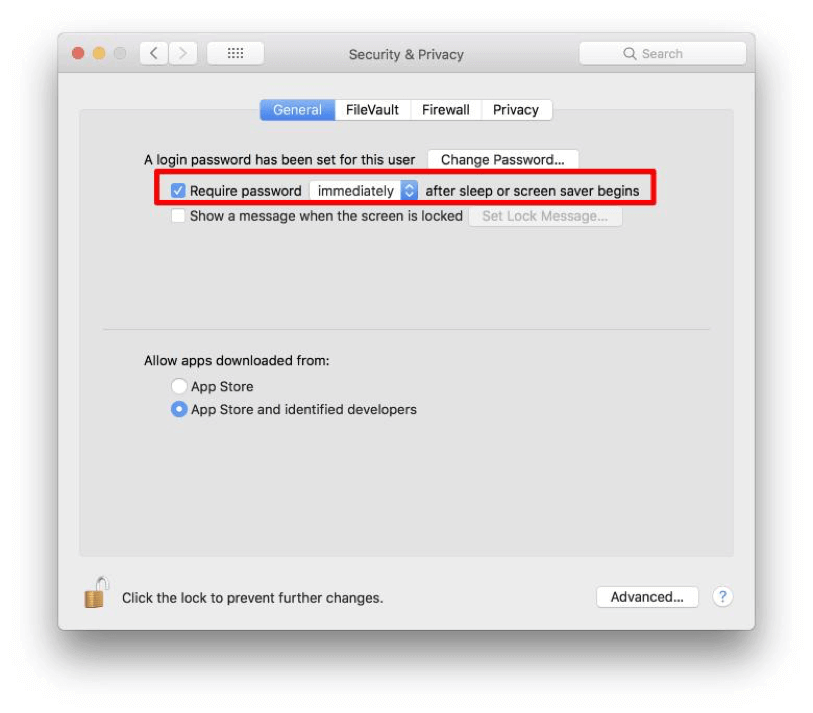
Next go to System Preferences > Security & Privacy. Under the General tab, check the box that says “Require password <immediately> after sleep or screen saver begins.” I recommend using “immediately” as the response for the most security.
You may like these posts
3. Encrypt local backups—Time Machine and Cloned
Historically, law firms used local backups, choosing to back up data either to a locally attached external hard drive or to the in-house server. For the law firms we support, GlobalMac IT currently favors cloud-based backups—due to cloud infrastructure advancements, it is now often easier to back up files to the cloud for the majority of law firms.
Whether you’re creating local backups via Time Machine, or creating a local clone using SuperDuper or CarbonCopyCloner, ensure you have encryption enabled. Just as you’ll need to enable encryption for FileVault to keep your Macbook’s drive secure and not accessible, you’ll need to encrypt your backups to ensure those are secure as well. With Time Machine, this is simple. Go to System Preferences > Time Machine. With your backup drive connected, click on “Select Disk ….” Check the box that says “Encrypt backups.” [I did not have my backup hard drive attached when the above screenshot was taken, hence it being grayed out.]

For the clone options mentioned above, here are step-by-step instructions from a previous article.
4. Enable built-in Firewall
In previous versions of macOS, the Firewall option was cumbersome to use. However, while discussing the latest security tips with Tobias, he explained to me that the Firewall on my computer had in fact been enabled for quite some time—in short, Apple improved the Firewall functionality and made it non-intrusive.
Apple’s built-in Firewall prevents unauthorized applications, programs, and services from accepting incoming connections. This is another security layer that, once activated, helps protect your firm’s data and your client’s data.
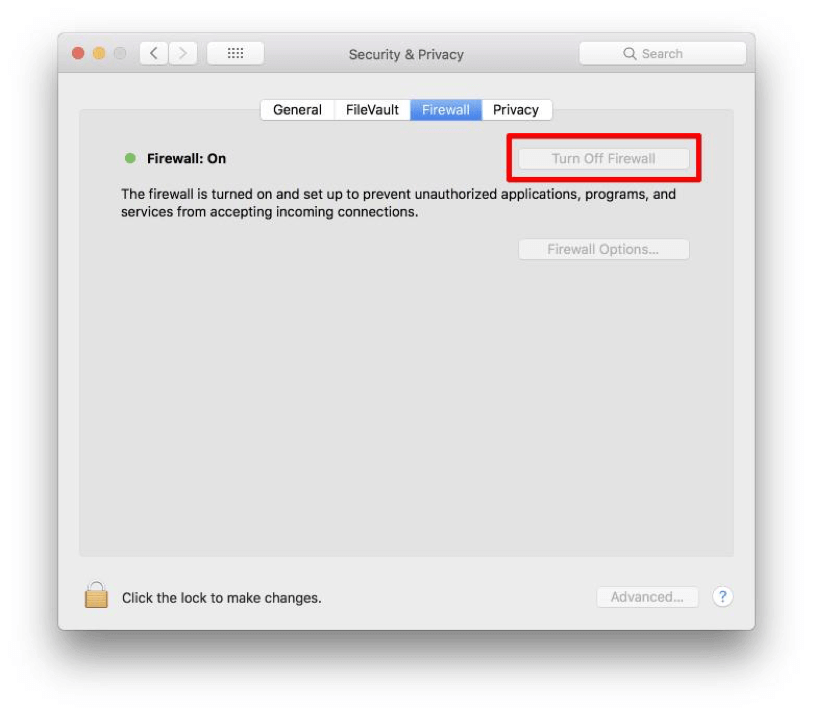
To make sure Firewall is enabled on your Mac, go to System Preferences > Security & Privacy and click on the Firewall tab. Click on “Turn On Firewall.”
5. Limit access to AirDrop
AirDrop lets you wirelessly share files between Mac computers. While this functionality may be convenient, enabling AirDrop creates a risk of exposing your computer to security vulnerabilities that would arguably otherwise not exist.
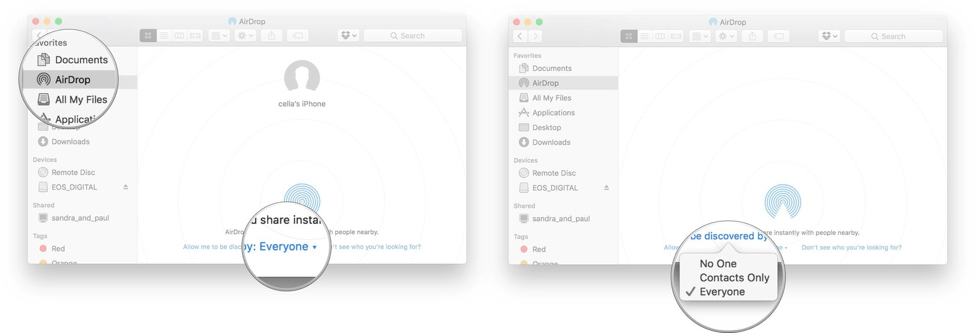
We recommended that you disable or limit the functionality of AirDrop on your computer. AirDrop lets you choose between enabling it for just your contacts, or for everyone. Choosing “Contacts” means that sharing files via AirDrop will require more work, as you and the person you want to AirDrop with both have to be logged into iCloud and be in each other’s Contacts. Choosing “Everyone” makes things easier, but it also means random people can send you files. For increased security, switch this setting to “Contacts Only”—and if you never use AirDrop, select “No One” to turn it off completely.
To switch your settings, first launch the Finder on your Mac. Click on AirDrop in the left navigation. Select “Off” to disable AirDrop, “Contacts Only” to enable only your contacts to AirDrop you, or “Everyone” to let everyone AirDrop files to you.
6. VPN—Encrypt.me
A Virtual Private Network (VPN) is a service that lets you access the web safely and privately by routing your connection through a server and hiding your online actions. This is useful whether you’re on a PC or a Mac. If you work on client files using public Wi-Fi, using a VPN will add an extra layer of security to your data, ensuring you bypass the coffee shop’s ISP, and encrypting all your communication. Hackers will need to find easier prey. The cost of a potential security breach dwarfs the nominal cost and slight inconvenience of using a VPN regularly.
However, with so many options to choose from, it is common for a user to not make a choice at all. Encrypt.me is our preferred option. It automatically enables itself when you are on an unsecured network, such as in a Starbucks or at an airport. You don’t need to remember to activate it or go through lengthy connection processes—you install it and it protects you. For $10 a month, one account can protect all the devices that user owns. Encrypt.me also offers family and team plans, as well as annual discounts.
7. Disable sharing services
By default, macOS enables several sharing options, such as printer sharing, internet sharing, and File Sharing. These services allow you or others to connect to your Mac for various purposes. If you have no need to have these services advertised, you can disable them altogether.
This page on Stanford.edu explains each service and their security recommendations, and these recommendations align with ours. If you’re uncertain whether you are using something, you most likely don’t need it.
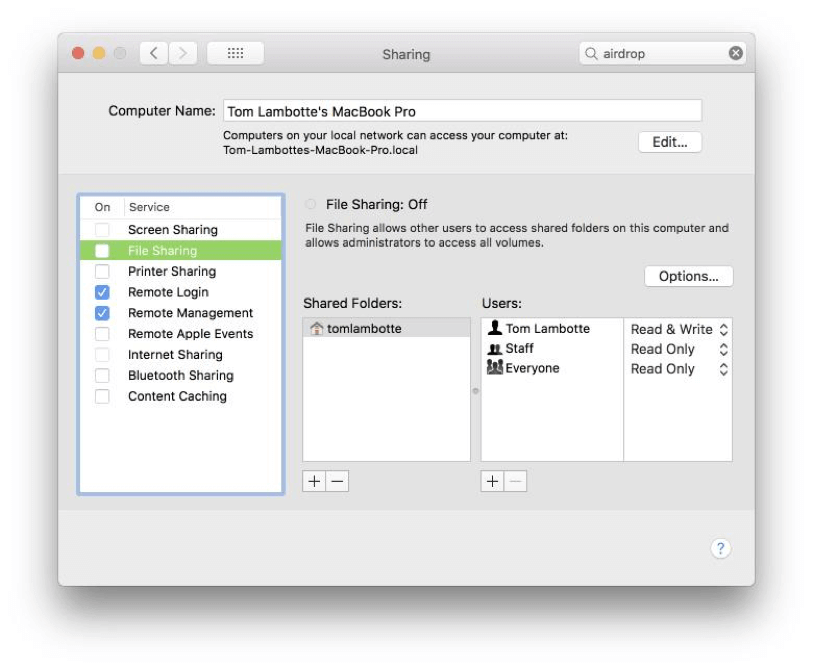
Specifically with File Sharing, disabling it is the most secure option for your MacBook: This approach keeps everything else from being allowed to connect to your Mac.
Go to System Preferences > Sharing.
In our case, my company uses tools for Remote Login and Remote Management, so those are enabled.
8. Ensure you do not have auto-login enabled, or a user account without a password
Another big security risk is automatic login. When enabled, your computer logs you in automatically any time you (or anyone else) turns it on, which is clearly a security issue—think of what would happen should any bad actors get their hand on your device.
If you have this enabled, disable it immediately. Go to System Preferences > Users & Groups. Click on Login Options, then switch automatic login to “Off.”
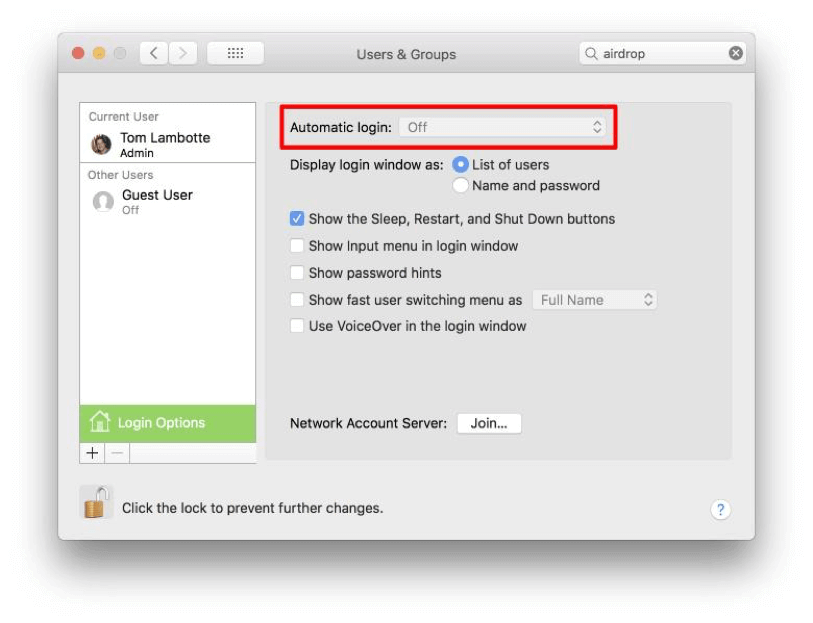
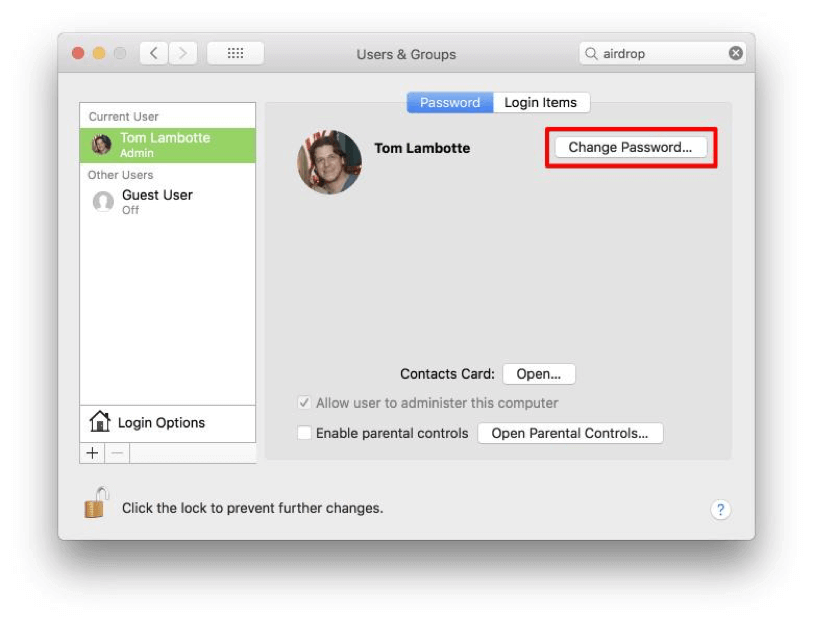
In earlier versions of macOS, back when it was still OSX, you could create an admin account and leave the password blank. If you can leave the password field blank and hit enter and login, you may be using one of these systems. While this is no longer possible with macOS, we’ve run into this on rare occasions.
If this is you, check to make sure your device doesn’t have an account without a password, and if such an account exists, add a password! In the same Users & Groups screen as above, click on your user, then Change Password …
9. Use a mobile device management solution
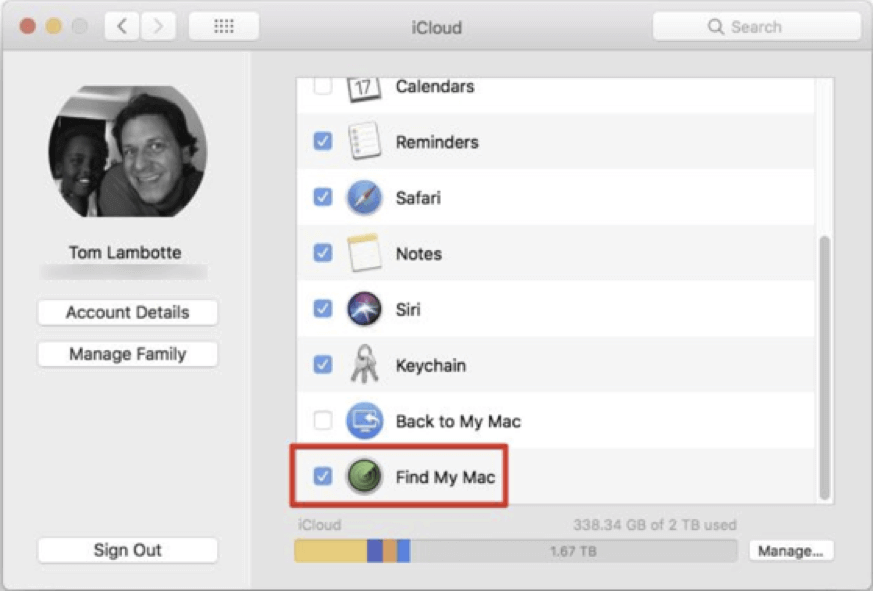
You simply MUST have a way to secure the data on your mobile devices, which includes your iPhone, iPad, AND your laptop. There are plenty of tools available to help with this. At a minimum, if it’s just you and no one else, iCloud will suffice, as it provides “Find My…” services. In case of loss or theft, this will enable you to locate, lock, and erase your device.
To set this up, log into all your devices with the same Apple ID, and enable Find My iPhone/iPad/Mac on all your devices.
Assuming you are logged into iCloud already, go to System Preferences > iCloud. Go down the list until you see Find My Mac. Check the box. Voila!
If you’re at a small or mid-sized firm rather than a solo practice, iCloud isn’t suitable for your needs. You need a tool in place to locate, lock, and erase all devices. Two simple solutions to get up and running with are JAMF Now and Simple MDM. JAMF Now is free for your first three devices, then it is $2 per device, per month. Simple MDM is $3 per device per month. Both are highly respected solutions that are simple to implement.
Conclusion
There you have it: nine tips to increase security for Mac users.
Please, don’t read this and forget about it. I suggest you start with blocking off one hour to increase security at your firm. Bring out this list and see how many you can complete in that time frame—I bet you’ll get through more than you think. If needed, block off more time to complete the rest.
If nothing else:
- Enable FileVault and encrypt backups. Encryption is essential for all your files.
- Restrict AirDrop, or turn it off if you’re not using it. There’s no need to let anyone and everyone share files with your Mac.
- Lock your screen. In the digital era, it’s easy to forget that sometimes the biggest security risk isn’t a hacker, but someone glancing at your screen. Take simple steps to keep your work private.
While there’s plenty that can be done to increase security at your firm, the items on this list will significantly move the needle for protecting your firm and for taking the proper security measures needed as a Mac-using attorney.
We published this blog post in September 2018. Last updated: .
Categorized in: Technology


