With over 2.8 billion monthly active users, Facebook is the largest social media network in the world. It could also be the most valuable platform for marketing your law firm. We’ve spoken previously about the benefits of Facebook advertising for law firms, and about how to decide whether Facebook advertising is right for your practice.
But once you’ve decided to advertise your firm using Facebook, where do you start?
How do you create your first Facebook ad for your law firm? How do you deliver it to the right people, in the right way, while keeping your marketing efforts under budget?
It’s easier than you might think. We’ll walk you through the steps below.
1. Write a blog post
Your first step towards creating your first Facebook advertising for your law firm starts outside of Facebook. You’ll need to link to something compelling to entice Facebook users to click your ad.
This is called content marketing—distributing valuable, relevant content to position yourself as a subject matter expert for those who are likely to need your services. For example, someone who is looking to get a divorce will be more likely to read a blog post entitled “8 Things to Ask Your Divorce Lawyer”—and that person will be more likely to remember your site and your post when the time comes to hire a family lawyer.
As a bonus, it’s less expensive to advertise with useful content on Facebook. Facebook uses algorithms to determine how closely your post resembles an ad, and posts that don’t resemble an ad will be cheaper for you to promote. There are plenty of content types you can create, including videos, infographics, and podcasts. But if you’re new to content marketing, blogging is a good place to start. Think about what your clients might want to know about, or the most common questions when they come into your firm. Then jot down some ideas, and get writing!
For the sake of this post, we’re going to assume you’re a lawyer focused on wills and estates, and that you’re writing a blog post entitled “Just Married? 3 Ways to Structure Your Will to Protect Your Loved Ones.”
If you don’t have a blog yet, there are plenty of free blog platforms available (WordPress is the largest, but LexBlog is geared specifically towards lawyers). And setup is fairly easy—this very brief example took us less than 45 minutes to create.
Hint: For more advice on blogging for lawyers, check out How to Blog Effectively: a Guide for Law Firms.
2. Create your law firm’s Facebook page
If you haven’t already, a key step to mastering Facebook ads for lawyers is to create your law firm’s very own Facebook page. Having a dedicated Facebook page will help build your brand’s awareness organically and, potentially, encourage reviews.
Be sure to optimize your Facebook page according to Facebook’s best practices, to set yourself up for success when you start creating Facebook. This includes:
- Using high-quality images, videos, and GIFs (animated images)
- Creating engaging copy that persuades your audience to take an action
- Tailoring your posts and ads to your target audience
You may like these posts
3. Head to Facebook’s ad manager
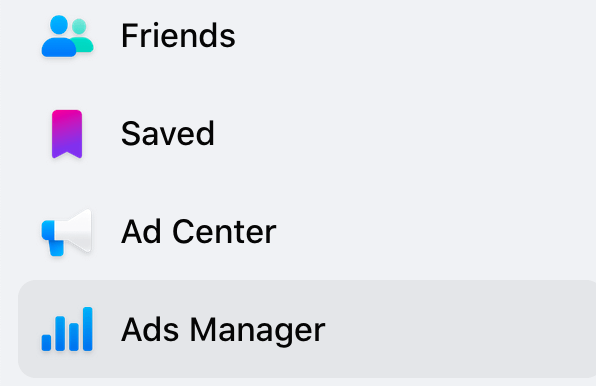
Getting to Facebook’s Ads Manager is simple. Just go to the menu on the right-hand side of your screen and click “Create Ads.”
4. Choose your Facebook ad campaign objective
The first page in Ads Manager will ask you to choose an objective for your Facebook advertising campaign. This is an important first step as Facebook will optimize your campaigns to the objective you choose.
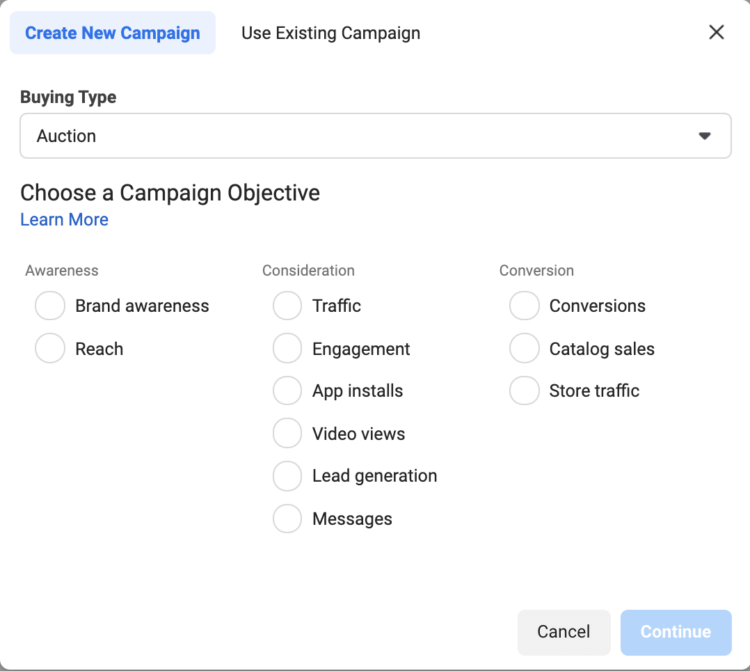
While it may seem daunting with so many campaign objectives to choose from, you’ll likely want to stick with these two:
- Traffic: Great for driving Facebook users to your law firm’s website.
- Conversions: Great for getting Facebook users to complete a specific goal on your site. For example, if you want a potential legal client to fill out a contact form on your site, you can use this objective. This way, Facebook optimizes your ads for people most likely to fill out your form. To use this objective type, you’ll need to create and install your Facebook pixel.
In our example, we’ll choose the “Traffic” objective so that we can drive traffic to that blog post you just wrote.
5. Target your audience
When it comes to Facebook advertising for law firms, you’re not advertising to just anyone. The social media platform features plenty of targeting options, so you can get your ads to the people who are most likely to work with you.
For example, for our blog post “Just Married? 3 Ways to Structure Your Will to Protect Your Loved Ones,” you could target:
- Engaged couples
- Newly engaged couples
- Newlywed couples
You can do this in the “Detailed Targeting” section. Just start typing and Facebook will suggest segments for you to target:
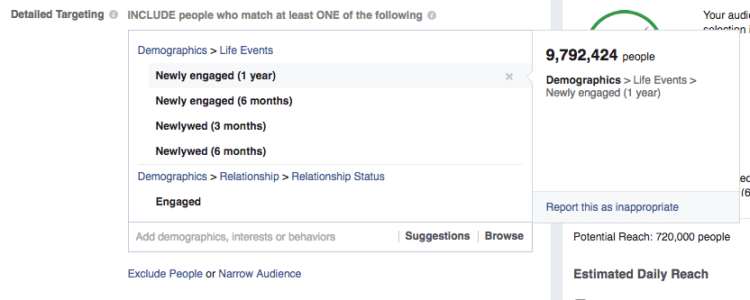
Scroll over each segment to get an idea of how many people you’re reaching.
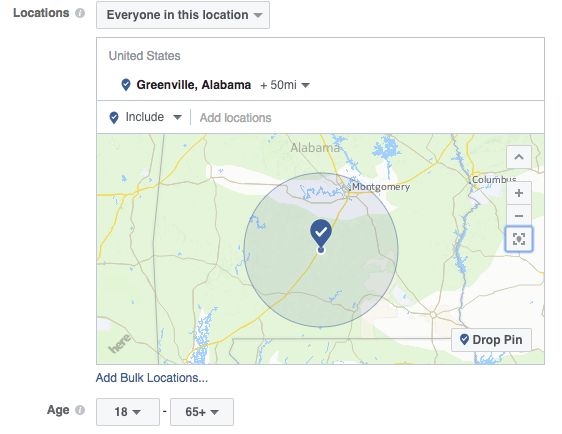
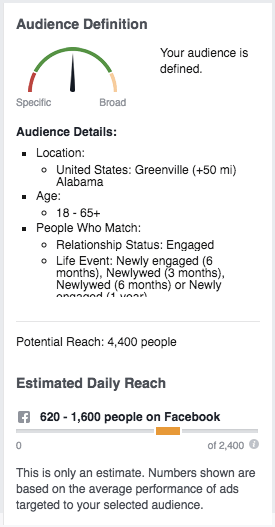
Near the top of your page, you can also target users based on their location. For example, if your law firm is located in Greenville, Alabama, it’s probably a good idea to target your ad towards Facebook users who live there.
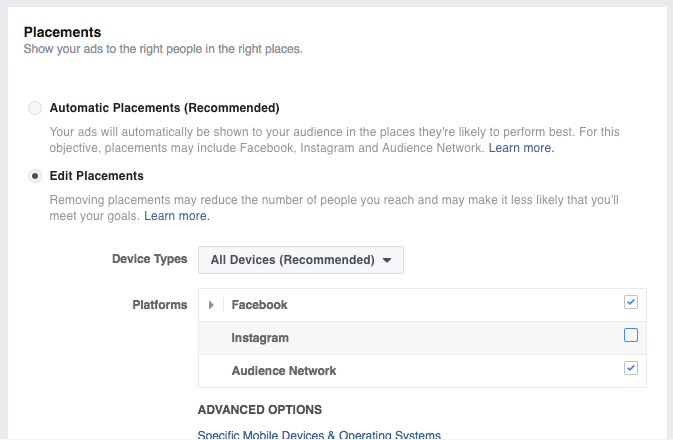
Finally, Facebook will automatically post your ad to Instagram as well. If you don’t have an Instagram account (or if you simply don’t want to post your ad on Instagram) you can disable this option.
On the right-hand side of the screen, you’ll be able to see an estimate of how many people your ad will reach per day. For our fictional ad, it’s between 620–1600 people. That range may seem wide, but how well your ad resonates with people will determine how well it performs.
6. Set your budget (and schedule)
You have a few options when structuring how to pay for your Facebook Ad:
Daily Budget versus Lifetime Budget
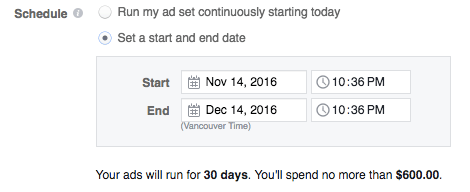
This is fairly straightforward: You can set an average budget for how much you’ll spend on your Facebook Ad per day, or you can set a maximum spend for the duration that your ads are being promoted. For example, you could pay $20 per day, or a maximum of $200 over 20 days.

Choosing a Lifetime Budget is a better choice if you want to keep your marketing spend under control. However, if you use a Lifetime Budget, you won’t be able to run your ads continuously—you’ll need to set a start date and an end date. The downside of running a Daily Budget is that even if your ad is performing exceptionally well, once it reaches the amount for the day it stops displaying—so budget wisely.
Cost per click of Automatic versus Manual bids
How do you get to your $20 per day maximum? Each time someone clicks your ad to get to your website, Facebook will charge you money. How much? That’s up to you.
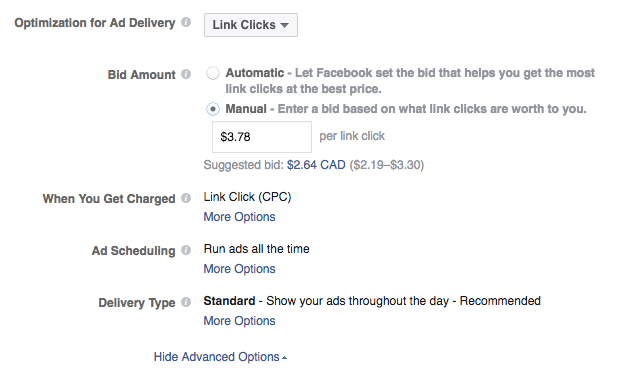
Under the Advanced Options under the “Budget & Schedule” section, you can choose to trust Facebook to get you the most link clicks at the best price (automatic bids) or you can set a maximum that you’re willing to spend (manual).
Either is fine, but keep in mind that the cost-per-click partially determines how many people will see your ads. If you set your maximum bid to five cents, very few people (if any) will come across your ad. But, as mentioned above, you’ll enjoy a lower cost-per-click for your ad if its content is well-written and engaging.
Want to go solo, but worried about choosing the right price? Don’t worry. If you choose to bid manually, Facebook will still suggest appropriate bid amounts:
Once that’s done, hit “Continue” to start formatting your ad.
7. Format your Facebook ad
Now for the fun part: creating your first Facebook ad!
There are two ways to do this: Create a new ad from scratch or use an existing post.
If you’re creating a new ad from scratch, you’ll need to add a Primary Text and a website URL—in this case, you would put the URL of your blog post. We would also recommend adding a Headline. Feel free to get creative and test out multiple Primary Texts and Headlines to see what resonates best with your audience.
If you have an existing post to choose from, we’d recommend you use it as your Facebook ad as an existing post may have previous likes and shares attached to it, and that social proof will make the ad more compelling for those who see it for the first time.
8. Pay Facebook
Once you’ve reviewed your ad, scroll to the bottom of the screen and, hit “Publish.”
Congratulations, you’ve created your first Facebook ad for your law firm.
9. Track your performance
When it comes to online advertising, especially Facebook ads for lawyers, you can’t just set it and forget it. After running your Facebook ad for a day or two, check in regularly to see how it’s performing.
You can see this in the Facebook Ads Manager, under the “Ad Reporting” screen. This report includes information such as the number of clicks your ad received, the cost per click, and the total dollar amount spent so far.
If your ad is bringing in plenty of clicks, you may want to run it a little longer, or run a similar campaign. If not, you’ll likely want to try a different post for your next campaign.
Either way, get creative with your Facebook Ads. Also, don’t be afraid to try new things. You never know what might grab a potential client’s attention.
That’s it! Now you know how to set up Facebook advertising for your law firm.
Facebook advertising for law firms
When done right, Facebook advertising for law firms is an affordable way to connect with potential clients. Here’s what to keep in mind to ensure your Facebook marketing efforts are successful:
- Create valuable content. A blog post with valuable information will be more compelling for potential clients who view your ad. A quality blog post will also bring down your advertising costs.
- Budget wisely. Choose a lifetime budget if you want to keep a lid on your marketing spend.
- Use an existing post. Save yourself the time needed to create a new ad by using a previous post on your company’s Facebook page instead. If it already has likes and shares, the ad will be more compelling.
- Track your performance. There’s only one way to know whether your ads are working: Use Facebook or another tool to check whether Facebook users are clicking. If they’re not clicking, change your strategy.
Keeping learning. Read; how do law firms get clients.
We published this blog post in April 2016. Last updated: .
Categorized in: Marketing, Technology


