
Contents: Microsoft Word for Lawyers: Master Legal Drafting & Templates
-


10. How to Create a Table of Authorities in Word

Few things test an attorney’s patience like a Table of Authorities (TOA) that refuses to behave.
The brief is nearly done, the filing deadline is close, and it’s time to generate the TOA. What should take a few clicks becomes a troubleshooting session. Cases are missing, page numbers are wrong, short cites aren’t matching, and sometimes the table simply stops updating altogether.
The frustrating part is that while Microsoft Word has a Table of Authorities feature, TOAs aren’t just simple lists you fill in. They’re field-driven systems that are tightly tied to how the document is structured. When that structure breaks down during drafting, the table breaks with it.
What’s more, creating the TOA is only half the battle. Keeping it accurate while the brief is still changing is where things often fall apart during legal workflows. The good news is that these problems are solvable, once you understand what’s actually driving them.
This guide explains how to create a Table of Authorities in Word for legal briefs, how they work beneath the surface, how to troubleshoot the most common errors, and how to keep the table accurate right through to filing.
What a Table of Authorities does in a legal brief
A Table of Authorities is a citation index for your brief, listing every legal authority you’ve cited and showing the page where each one appears. Courts use it to locate authorities quickly without reading through the entire document.
Most TOAs are divided into categories:
- Cases
- Statutes
- Regulations
- Secondary authorities (law review articles, treatises, etc.)
Many courts require a TOA for briefs that exceed a set length. Federal rules and state requirements vary, so check the local rules before finalizing your tables. In California, for example, any memorandum exceeding 10 pages must include a table of authorities under Rule 3.1113, while federal appellate briefs require one regardless of length under FRAP Rule 28.
To confirm whether you need one or not, check the relevant rules of court, local rules for the district, and any standing orders from the assigned judge. All of these are typically published on the court’s website.
How Microsoft Word actually builds a Table of Authorities
A Table of Authorities is a dynamic, field-generated index. It’s not a static list you fill in manually. The accuracy of the entire table depends on whether the Table of Authorities Entry (TA) fields throughout the document are correct and consistent.
When you mark a citation, Word embeds a hidden TA field code into the document. This field stores everything the table needs, such as:
- The long citation text (the full case name or statute)
- The short citation reference (how you refer to it later in the brief)
- The authority category (cases, statutes, etc.)
- The page location
For example, a TA field looks like this:
{ TA \l “Brown v. Board of Education, 347 U.S. 483 (1954)” \s “Brown” \c 1 }
When you insert or update the table, Word scans every TA field in the document and compiles them into the TOA.
Most TOA errors trace back to those field codes becoming inconsistent during editing, copying, or revision.
Table of Authorities vs Table of Contents
Given how similar tables of authorities and tables of contents look in Word, you might expect them to work in a similar way. However, that’s not the case, and this difference often presents issues for lawyers trying to master Microsoft Word.
A Table of Contents is built from heading styles. Word scans the document for paragraphs formatted with heading styles and automatically compiles them into the TOC. As mentioned in the last section, a Table of Authorities is instead built from TA field codes.
Understanding that distinction matters. A TOC largely takes care of itself once heading styles are applied correctly, but a TOA requires active management of citation fields throughout the entire drafting process.
The basic workflow for creating a Table of Authorities in Word
There are four basic steps to creating a Table of Authorities in Word:
1. Mark each legal authority
Use Word’s Mark Citation tool, which you’ll find under the References tab, to identify each authority in the brief (more on this below). Word can’t include an authority in the table unless it has been marked.
2. Assign citation categories
When you mark a citation, you assign it to a category: Cases, Statutes, Regulations, or Other Authorities. These categories determine how the table is grouped and displayed.
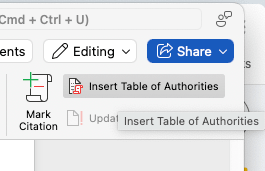
3. Insert the table
Once citations are marked, go to References > Insert Table of Authorities. Word compiles all marked citations into a formatted table. You can then choose which categories to include and set formatting options at this stage.
4. Update the table
You need to refresh the table whenever the document changes. Right-click the table and select Update Field to regenerate it with the current citation data and page numbers.
How to mark citations in Word for a Table of Authorities
Marking citations is the first and most important step. Everything else in the TOA process depends on getting this right. Word can’t include an authority in the table unless the citation has been marked with a TA field, so if the marking is incorrect, the table will be too.
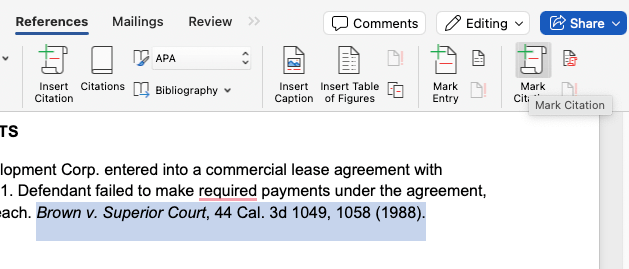
To mark a citation:
- Select the full citation text in the document. For example: Brown v. Board of Education, 347 U.S. 483 (1954).
- Go to References > Mark Citation (or use the keyboard shortcut Alt+Shift+I on Windows and Option+Shift+I on a Mac).
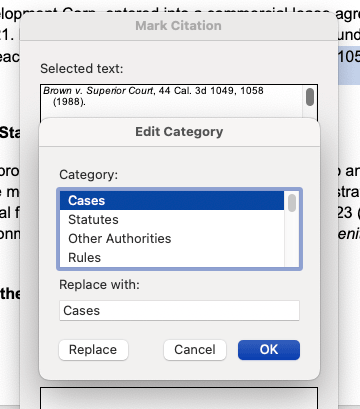
- The Mark Citation dialog will open. Confirm the long citation text, or edit this if required (e.g. to clean up the formatting or remove pinpoint citations from the long cite).
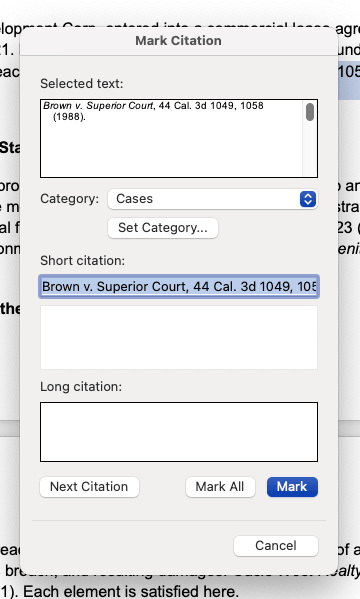
- Enter the short citation. This is how you refer to the case later in the brief, for example, Brown or Brown v. Board of Education.
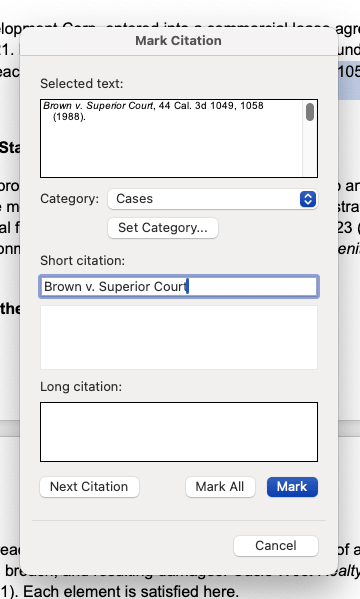
- Assign the correct category (Cases, Statutes, Regulations, etc.).
- Click Mark to mark this instance, or Mark All to mark every occurrence in the document. Use Mark All with care though. It marks every matching string in the document, including any appearances in footnotes or quoted text, which can create unwanted entries in the table.
The short citation is particularly critical. When Word scans the document to compile the table, it uses the short citation to identify later references to the same authority. If later references don’t match the short cite exactly, Word may treat them as separate entries or miss them entirely.
For this reason, standardize short-cite formats early in drafting and apply them consistently throughout the brief.
How to insert a Table of Authorities in Word
Once citations are marked, inserting the table is a fairly straightforward process:
- Place your cursor where the table should appear, typically after the cover page and before the body of the brief.
- Go to References > Insert Table of Authorities.
- In the dialog, select the citation category you want to include, or select All to include every category in a single table.
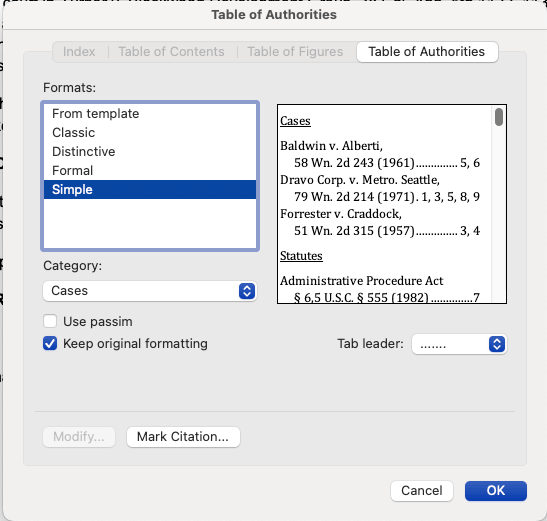
- Set your formatting preferences (see below).
- Click OK to generate the table.
Editing and formatting a Table of Authorities in Word
Courts sometimes have specific formatting requirements for Tables of Authorities: indentation, tab leaders, font size, and category labels. That’s where these four settings come in:
- Citation categories: You can generate one combined table or separate tables for each category. Many courts prefer separate sections for cases, statutes, and regulations. Check local rules (either on the court’s website or https://www.uscourts.gov/ for federal courts) before deciding.
- Tab leaders: These are the dots or dashes that run between the citation and the page number. Most legal filings use dot leaders, but some courts specify otherwise.
- Page number format: You can display exact page numbers or use “passim,” which Word inserts automatically for authorities cited on five or more pages.
- Table style: Word applies its built-in TOA style by default. You can modify this through the style settings, but do it there rather than formatting the table directly. Any direct formatting will be wiped out the next time you update the table.
Whatever adjustments you make, do them through the TOA paragraph style rather than directly in the table. It sounds like a small distinction, but it matters: anything you format by hand in the table itself will be wiped the next time you update it.
Edit the style once, and your formatting holds through every refresh.
How to update a Table of Authorities during revisions
Creating a TOA isn’t a one-and-done task. Whenever you make a significant change to the document, you also need to refresh the table.
For example, when you:
- Add or remove citations.
- Insert new pages or sections.
- Restructure arguments (which shifts page numbers).
- Revise case references or short cites.
Always update the entire document before updating the table. Select all (Windows: Ctrl+A, Mac: ⌘+A), press F9 to update all fields, and then right-click the TOA and select Update Field. If you update the table before updating the document, the page numbers may not reflect recent changes.
Run the table update after every significant revision round, not just at the end of drafting. Catching errors early is much easier than untangling them the night before filing.
How to delete or reset a Table of Authorities in Word
To remove the table entirely, select it and press Delete. This removes the compiled table, but the TA field codes embedded throughout the document remain in place.
To remove the underlying TA fields as well, turn on hidden field codes (Windows: Ctrl+Shift+8, Mac: ⌘+Option+9), search for each TA field, and delete them manually. You can also use Find and Replace with wildcards to locate and remove all TA fields at once.
But when should you rebuild entirely rather than repair?
Starting fresh is often the cleaner option if the document has undergone heavy revisions, multiple editors have changed citation formats, or the table is producing persistent errors after troubleshooting.
If this is the case, then delete the table, clear the TA fields, mark citations again from scratch, and regenerate. This takes time, but it’s more reliable than manually fixing inconsistent field codes through a long document.
Fixing missing cases in a Table of Authorities
If a case is missing from the table, the issue almost always lies in how the citation was marked, or how later references were written. Go through these 4 steps to identify and fix the issue:
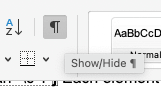
- Confirm the citation was marked: Turn on hidden field codes (Ctrl+Shift+8 on Windows, or via the paragraph mark button on a Mac) and look for the TA field near the citation. If there’s no field, the citation was never marked, and Word can’t include it.
- Check the short citation reference: Short cite mismatches are often the culprit behind missing entries. To fix this, open the Mark Citation dialog for that authority, check what the short cite is set to, then search the document to confirm every later reference uses that exact format.
- Verify the citation category: Make sure the authority was assigned to the right category. If a case was accidentally marked as a statute, it will appear in the wrong section of the table, which can make it look like it’s missing.
- Update all fields, then update the table: Use Ctrl+A on Windows, or ⌘+A on a Mac to select the entire document, then press F9 to update all fields. Then right-click the Table of Authorities and select Update Field.
If the citation still doesn’t appear after these steps, delete the TA field, re-mark the citation, and regenerate the table. Rebuilding the mark from scratch is often faster than trying to repair a corrupted field.
Why Tables of Authorities break during legal drafting
TOAs tend to break due to the nature of legal drafting rather than any specific issue with Word itself. Citation fields become inconsistent as the brief evolves, and when this happens, the table often falls apart.
TOAs are most likely to break during:
- Heavy revision rounds.
- Briefs drafted by multiple authors or editors.
- Citation updates late in the drafting cycle.
- Text copied from prior briefs or other documents.
When things do go wrong, it’s usually due to one of the following issues:
- Citations are added after initial marking, without being re-marked.
- Short cites don’t match the original mark.
- Field codes become corrupted when text is copied between documents.
- Page numbers shift after late-stage edits.
What makes this particularly painful is the timing. These problems tend to surface at the worst possible moment: right at the end of the drafting process. Someone dives into the document to give it a final review or make a small edit, only to discover the TOA is incomplete or incorrect.
Why short citations break Tables of Authorities
This is one of the most common and frustrating TOA errors.
When you first mark a citation, you define the short cite. Word stores that as the reference point for all later mentions of the same authority. If later citations use a slightly different format, Word can’t connect them to the original mark.
For example:
- Original mark: Brown v. Board of Education.
- Later reference in the brief: Brown.
If “Brown” doesn’t match the short cite stored in the TA field, Word may create a duplicate entry in the table, omit some page references, or display the authority incorrectly. This happens most often in collaborative drafting, where different authors use slightly different citation formats, and in briefs adapted from earlier work.
The good news is that most of these failures are preventable. They originate in the drafting workflow, and that means they can be addressed with the right habits and processes, which we’ll cover in detail below.
Master Microsoft Word for Legal Drafting
This is just one piece of the puzzle. Explore the Master Microsoft Word for legal drafting hub for all our Word resources for legal professionals.
MS Word Hub
Maintaining TOA accuracy in collaborative legal drafting
In most firms, legal drafting is a collaborative process. Partners, associates, and paralegals all work together, each leaving their mark on legal documents.
But the more people touching a document, the more opportunities there are for citation fields to drift.
Consider adopting the following best practices during your drafting workflow to maintain TOA accuracy:
- Assign one person to own the final TOA review. This doesn’t have to be a partner. A trained paralegal or litigation support professional who understands how TA fields work is often the right person for this role.
- Agree on short-cite formats before drafting begins and document them somewhere the whole team can reference.
- Update the entire document and the table after each major revision round, not just at the end.
- Run a final TOA check after the last round of edits, once page numbers have been confirmed.
Most collaborative TOA failures come down to two things: no agreed citation standards, and no clear owner. Fix those, and Word will do the rest. That said, even well-managed workflows can run into problems as briefs grow longer and revision cycles multiply. We’ll cover how templates and dedicated drafting tools can help with that below.
Preventing TOA errors with legal templates
While collaboration affects how citations are edited, templates affect how the document is structured from the start. A well-designed brief template can eliminate many common TOA problems before drafting even begins.
For example, templates can standardize:
- Default citation categories included in every brief.
- Consistent formatting styles for TOA entries.
- Document structure that supports reliable field updates.
- Clear update workflows, embedded as notes or reminders for the team.
When these settings are part of the template, attorneys don’t need to rebuild them each time. This reduces the risk of inconsistent categories, formatting conflicts, and errors introduced when documents are adapted from prior matters.
Getting the template right once is considerably easier than fixing citation errors across a hundred briefs.
How to simplify TOAs with Clio Draft

Templates reduce setup errors, but building them correctly takes time, and they still need to be managed consistently throughout drafting, by every person who touches the document. At a certain volume and complexity, both of those things start to become the bottleneck.
That’s where a drafting system such as Clio Draft comes in. Its AI template builder converts your existing documents into reusable, automation-ready templates in minutes, automatically identifying structure and required fields, so there’s no need to rebuild citation infrastructure from scratch for each new matter.
Once those templates are in place, document automation populates case and client information across multiple documents simultaneously, rather than requiring it to be retyped across drafts.
For firms managing multiple filings within a single matter, Clio Draft’s document sets functionality bundles related templates into a single package. Generate court form packets, litigation packages, and client onboarding bundles in one step, and any update to a template carries through to the entire set.
The result is a more reliable process from the first draft to the final filing, without depending on everyone remembering every step.
Final checklist before filing a brief with a Table of Authorities
Once the brief is in its final state, work through this checklist before you file:
- All authorities cited in the brief appear in the table.
- Page numbers are accurate and reflect final pagination.
- All document fields have been updated (Ctrl+A > F9).
- No duplicate entries exist in the table.
- Citation categories are correct for every entry.
- The table format complies with court requirements for your jurisdiction.
- The table has been updated after the very last edit to the document.
- Run the brief through Clio Work to verify that all cited cases are accurate and up to date.
Validate the TOA after the final draft, not during active revisions. Checking it too early means you’ll need to check it again anyway.
Moving beyond manual Tables of Authorities
Manual TOA management just about works for straightforward briefs. But as briefs grow longer, revision rounds multiply, and teams get larger, it gets harder to reliably maintain manual approaches.
Citation lists expand and short cites drift. Field codes accumulate errors. The risk of a filing error increases with every round of edits. At a certain point, taking the manual approach starts to become a genuine liability.
The alternative is to take citation management out of the equation entirely. Structured drafting systems maintain citation structure, numbering, and document formatting automatically, so the table stays accurate as the brief evolves rather than needing to be rebuilt or verified at the end.
Clio Draft is built for exactly this kind of legal drafting environment. Where Word requires lawyers to manually mark every citation and carefully manage field codes across revisions, Clio Draft handles document structure automatically, reducing the risk of citation errors and formatting failures.
For firms that file frequently or manage complex appellate matters, it’s worth exploring how a structured drafting tool like Clio Draft can replace your manual citation workflow.
Book a demo today to get started.
Creating a Table of Authorities in Word FAQs
How do you create a Table of Authorities in Word?
Mark each citation using References > Mark Citation, assigning a long cite, short cite, and category for each authority. Once all citations are marked, go to References > Insert Table of Authorities to generate the table. Update it with a right-click whenever the document changes.
Why is a case missing from my Table of Authorities?
The most common causes are an unmarked citation, a short-cite mismatch between the TA field and later references to the same case, or the authority being assigned to the wrong category. Check each of these in order. If the problem persists, delete the TA field, re-mark the citation, and regenerate the table.
How do you update a Table of Authorities in Word?
Select the entire document (Ctrl+A), press F9 to update all fields, then right-click the Table of Authorities and choose Update Field. Always update the document before updating the table to ensure page numbers are current.
How do you remove a Table of Authorities in Word?
Select the compiled table and press Delete to remove it. To also remove the underlying TA field codes, turn on hidden characters (Ctrl+Shift+8) and delete each TA field from the document. You can use Find and Replace with wildcards to locate them all.
How do you mark citations in Word for a TOA?
Select the citation text, then go to References > Mark Citation (Alt+Shift+I on Windows). Enter the long citation, the short citation, and the category. Click Mark to mark the selected instance, or Mark All to mark every occurrence of that citation in the document.
Does the Table of Authorities count toward word count in briefs?
This depends on court rules. Many courts exclude the Table of Authorities (along with the Table of Contents, cover page, and signature blocks) from the word count. Check the applicable local rules or standing orders for the court you are filing in, as requirements vary.
Can you hyperlink a Table of Authorities in Word?
Yes, though Word’s built-in TOA tool doesn’t do this automatically. You can add hyperlinks manually using bookmarks and cross-references, or use a document automation tool that supports field-based linking for legal documents.
How do you fix formatting in a Table of Authorities?
Make formatting changes through the TOA paragraph style rather than editing the table text directly. Changes made directly to the table will be lost when the table is next updated. Editing the underlying style ensures your formatting persists through every refresh.
Master Microsoft Word for Legal Drafting
This is just one piece of the puzzle. Explore the Master Microsoft Word for legal drafting hub for all our Word resources for legal professionals.
MS Word Hub