
Contents: Microsoft Word for Lawyers: Master Legal Drafting & Templates
-


24. How to Clean Up a Word Document Received From Opposing Counsel

The redlined contract is on your desk. So is the draft motion with co-counsel’s comments still embedded and the term sheet that came back with formatting you don’t recognize. Before any of these documents can be worked on, incorporated into your template, or sent anywhere, three things need to happen: you need to understand what’s actually in the file (including what isn’t visible), normalize its formatting so it doesn’t corrupt your own templates, and strip anything that shouldn’t travel further down the chain.
Let’s cover a four-part cleanup workflow for documents received from outside your firm. We’ll put each step in order and go over why that order matters. In the end, you’ll be able to draft from any external document without issues.
Need a template you can use right now? Get our free MS Word legal templates, ready to download and customize.
Why external documents need a different approach
Documents you create have a known history. You know which styles are used, whether tracked changes are on, and what metadata the file carries. Documents from another firm carry none of that transparency.
They arrive with the originating firm’s style set embedded in the file. They have revision history you didn’t create, potentially including deleted content still accessible in the XML. They may contain comments not visible in Normal view, hidden text left by a template, and metadata (author names, firm identifiers, draft timestamps, prior version data) that you didn’t intend to receive and definitely don’t want to forward.
A proper cleanup has four distinct components, specifically in this order:
- Collaboration cleanup: Resolve or remove tracked changes and comments before anything else. If you run Document Inspector first, it will accept all tracked changes by default, and anything you might have rejected will become permanent.
- Metadata cleanup: Strip document properties, author history, and hidden data before the document moves anywhere.
- Important exception: Legal work product subject to discovery requires extra care. Removing or altering metadata on those files, even as part of routine cleanup, can trigger spoliation claims.
- Formatting cleanup: Normalize styles and remove direct formatting overrides so the document can be worked on without corrupting your firm’s templates.
- Structural cleanup: Repair broken numbering, section breaks, and heading hierarchy so the document behaves correctly in your drafting environment.
You can see that the sequence matters because reformatting before resolving tracked changes locks in errors and stripping metadata before reviewing changes can accept revisions you wanted to reject. Let’s explore each point in more detail.
1. Resolve tracked changes and comments first
Everything downstream from the cleanup stage depends on the document’s final content. That’s why we start with tracked changes and comments.
The hidden markup problem
Word’s Simple Markup and No Markup display modes hide tracked changes visually while leaving them fully intact in the file. A document that looks clean in these views may have dozens of embedded insertions, deletions, and formatting changes.
Before beginning any cleanup, switch to All Markup by going to the Review tab > Display for Review > All Markup.

Handling tracked changes in received legal documents
The right approach to tracked changes depends on the document’s purpose:
- Redlined contract or negotiated agreement: Create a working copy before accepting anything. Review each tracked change (opposing counsel’s proposed insertions, their deletions of your language) and accept or reject individually. Use Review > Previous Change and Next Change to move through changes, and Reject for any you’re not accepting.
- Draft document that arrived with markup accidentally left on: Accept all changes and turn off tracking in one step. Use Review > Accept > Accept All Changes and Stop Tracking, not Accept All Changes alone, which leaves tracking active and will record your subsequent edits.
Dealing with comments
Distinguish between comments that carry substantive information (a note from co-counsel explaining a redline, a question from opposing counsel requiring a response) and comments that are routine collaboration residue. Log or screenshot any substantive comments before deleting. Then clear all the remaining comments with Review > Delete (dropdown) > Delete All Comments in Document.
2. Strip metadata before the document goes anywhere
A Word document from another firm can carry more than its visible content. Author names and initials, the originating firm’s company information, revision history including deleted text, comments that were “deleted” but remain in the file’s XML, document creation and modification timestamps, and data from the originating firm’s document management system can all travel with the file.
Bar associations, including the ABA and multiple state bars, have issued guidance on inadvertent metadata disclosure in legal matters. Forwarding a document with intact metadata, whether to a client, a court, or back to opposing counsel, is a known professional responsibility concern. That’s why metadata cleanup should be a standard pre-delivery step regardless of which direction the document is traveling.
How to clean up metadata with Document Inspector
While using Document Inspector to clean up metadata is not difficult, it’s also not a one-click operation. Here’s how to run it properly:
- Save the document first. Document Inspector can’t be undone, and you need a saved version to return to if something is removed unexpectedly.
- Go to File > Info > Check for Issues > Inspect Document (Windows only).
- Review what it finds before clicking Remove All. Pay particular attention to headers and footers: if the document contains firm letterhead or a matter caption in the header, removing it may not be appropriate.
- Remove what should be removed, then run Inspect Document again to confirm.
What Document Inspector omits
Document Inspector doesn’t remove rogue styles from the originating firm. It doesn’t fix structural formatting problems. It doesn’t catch tracked changes that are hidden in the markup rather than accepted. But we’ll show you how to address all of that in the steps that follow.
Master Microsoft Word for Legal Drafting
This is just one piece of the puzzle. Explore the Master Microsoft Word for legal drafting hub for all our Word resources for legal professionals.
MS Word Hub
3. Clean up rogue styles and direct formatting
Styles is where the formatting corruption in received legal documents actually lives, and where legal professionals spend the most unplanned time. It’s also the least well-explained part of document cleanup.
What rogue styles are and how they enter your document
Every Word document carries an embedded style gallery. When you receive a document from another firm, you receive their style set alongside their content. Paste that content into your own document and those styles travel with it. A contract that has passed through three firms during negotiation may carry styles named “Contract Body,” “Normal (2),” “Heading 1 Char,” and a dozen others that have no relationship to your firm’s template.
These rogue styles cause inconsistent formatting, break TOC generation, corrupt automatic numbering, and prevent your own styles from applying correctly. For a deeper explanation of how styles break in legal documents and how to diagnose them, see our article on why Microsoft Word styles break in legal documents.
Why Clear All Formatting is the wrong tool for legal documents
Clear All Formatting (the eraser icon on the Home tab) strips direct formatting and resets text to Normal style. In a two-sentence email, that’s fine. In a 40-page appellate brief built on a heading hierarchy that drives TOC entries and outline numbering, it flattens everything. Use it on such a brief and the TOC entries vanish, with the heading structure collapsing to Normal.
To avoid this, don’t use Clear All Formatting for cleanup of received legal documents.
The correct approach: Style-by-style normalization
To manage styles correctly:
- Go to Home > Styles Pane.
- Sort the list by “Styles in use” to see which styles are actually applied to the document.
- Identify styles that don’t belong. Those could be styles named differently from your firm’s set or ones that carry “(2)” or “(Web)” suffixes that indicate Word resolved an import conflict by creating a duplicate.
- For each rogue style, on Windows, use Ctrl + H > More > Format > Style. Select the style in Find, pick your correct replacement style in Replace, and click Replace All. On Mac, go to Edit > Find > Advanced Find and Replace > Replace > Format > Style.
- Repeat until the document’s style set matches your template.

Clearing direct formatting overrides
Styles that don’t fit in your documents aren’t the only problem. The received document will likely contain direct formatting: manual bold applied to a heading that already has a Heading style, manually adjusted indent on a paragraph that should be following a style-defined indent, font changes applied per paragraph rather than through the style. These survive style replacement.
Use the Style Inspector to find and clear them by going to Home > Styles Pane > Style Inspector. Click through the problem paragraphs. The Style Inspector shows the paragraph style and any direct formatting overrides as two separate layers, each with its own Clear button. Clear the overrides and leave the style intact.
4. Repair structural damage
After style normalization, you need to verify the structural elements that depend on those styles. This step is easy to skip (the document looks correct at this point), but the problems it prevents are the ones that surface at filing time.
Heading hierarchy and TOC
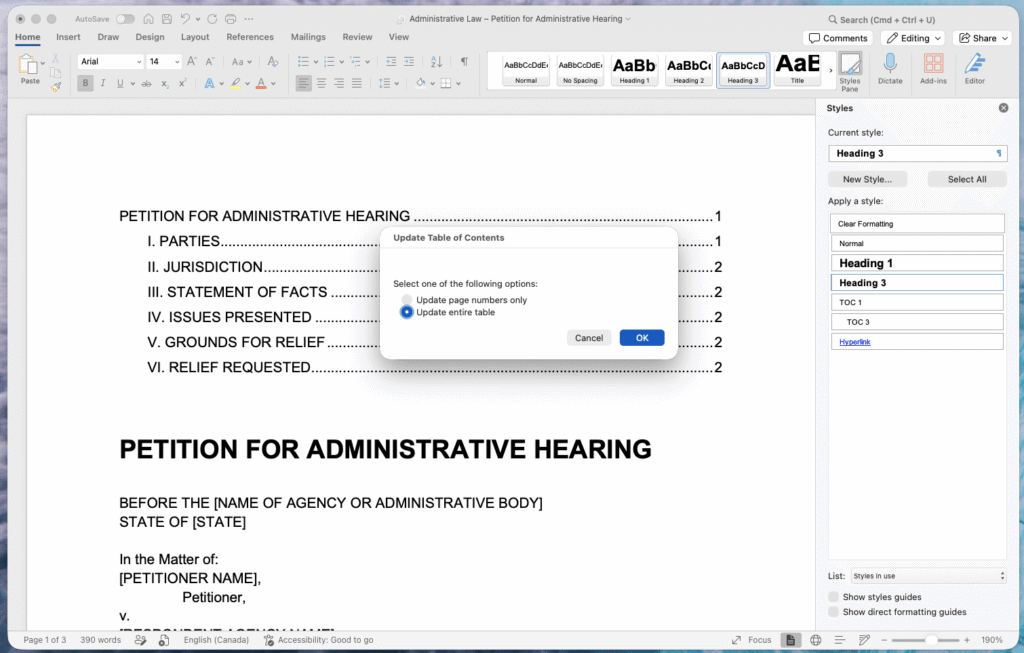
If the received document used a different heading style system, TOC entries may be missing or misattributed after normalization. Right-click the TOC > Update Field > Update Entire Table (both on Windows and Mac).
If entries are still wrong or missing, switch to Outline view (View > Outline) and confirm that each heading is tagged with the correct Heading style, not only visually formatted to look like one.
Outline numbering
Multilevel list numbering is the most fragile element in legal documents and the most likely to break after style replacement. After normalizing styles, check each numbered section in sequence. If numbering has reset or skipped, reapply the correct multilevel list style to the affected paragraphs. Don’t manually retype numbers, which would create the same problem you just cleaned up.
Section breaks and page numbering
Section breaks from the originating document may conflict with your template’s section structure. Switch to Draft view (View > Draft) to make section breaks visible. Check each break type (Next Page, Continuous, Even/Odd) and confirm they are positioned correctly for your filing format. An inherited section break in the wrong location will reset page numbering or change header and footer behavior in ways that aren’t visible until the document is printed or filed.
The pre-delivery checklist: Before this document leaves the firm
Use this checklist before sending a cleaned document to opposing counsel, a client, or a court.
Before sending to opposing counsel or a client:
- All tracked changes resolved
- Tracking turned off
- All comments deleted
- Document Inspector run
- Metadata stripped
- Rogue styles replaced with firm template styles
- Direct formatting overrides cleared from body text
- TOC updated
- Numbering checked through the document
Before filing with a court, add:
- Font and margin compliance verified against applicable court rules
- Page numbering confirmed as continuous or correctly sectioned per filing requirements
- No hidden text remaining (Ctrl + Shift + 8 to confirm, or Cmd + 8 on Mac)
- File saved as final version with a clean filename
When manual cleanup stops being worth the time
For an occasional document from opposing counsel, the four-step workflow above takes about 20 to 40 minutes on a complex file and less on a clean one. That’s manageable.
But it stops being manageable when it becomes routine. We don’t want to have attorneys spending more time reformatting than drafting and paralegals running the same cleanup sequence before every filing. We also don’t want templates drifting because cleaned documents get used as the base for new drafts rather than returning to a controlled template.
At that point, the problem isn’t Word skill or document discipline. Word’s document exchange model was not designed for the volume and variety of external collaboration that legal drafting involves. The cleanup problem doesn’t have a Word solution. You should rely on a workflow solution instead.
How Clio Draft reduces the cleanup problem at the source
Cleaning up a document from opposing counsel is a skill. Not needing to do it every time is a workflow, and that’s what Clio Draft is built for.
Clio Draft centralizes document generation from controlled templates, so drafts originate from a clean, firm-owned source rather than from whatever arrived in the inbox. Fewer documents passing back and forth in Word format means fewer opportunities for external formatting, rogue styles, and unknown metadata to enter your document base.
When cleanup is still needed, having a clean Clio Draft template as the target gives you a clear standard to normalize toward, rather than trying to reconstruct what the document was supposed to look like before it left the other firm.
As a result, firms that have moved their drafting to Clio Draft spend less time on cleanup because the documents they work from originate clean.
Beyond the checklist
Document cleanup from an external source consists of four tasks, and the order matters. Done systematically, it takes 20 to 40 minutes and produces a document you can trust. Done reactively, it becomes a recurring time sink that compounds across every matter.
The checklist in this article is a starting point. The workflow behind it (controlled templates, consistent cleanup sequences, and a drafting environment that reduces external document exchange) is what determines whether cleanup stays manageable as your practice scales. Firms that have made that shift with Clio Draft spend less time cleaning up documents because fewer documents arrive needing it.
Cleaning up legal word documents FAQs
How do I remove another law firm’s styles from a Word document?
Open Manage Styles (Home > Styles Pane) and sort by “Styles in use” to identify which styles are active. For each style that doesn’t belong to your template, use Find & Replace (Ctrl + H > More > Format > Style) to find all text in that style and replace it with your correct style. Don’t use Clear All Formatting, as it resets everything to Normal style, which breaks heading hierarchy and TOC generation in complex legal documents.
What does Document Inspector remove from a legal Word document?
Document Inspector finds and removes comments, tracked changes, document properties, personal information, hidden text, custom XML data, and embedded objects. It doesn’t remove rogue styles, fix structural formatting problems, or catch tracked changes that are hidden rather than accepted. Always review the inspection results before clicking Remove All, as headers, footers, and embedded objects may contain content you need to keep.
Is it an ethics violation to send a Word document with metadata to opposing counsel?
Bar associations including the ABA and multiple state bars have issued guidance on inadvertent metadata disclosure. Whether a specific disclosure constitutes an ethics violation depends on your jurisdiction’s rules and the circumstances. Check your jurisdiction’s guidance and treat metadata cleanup as a standard pre-delivery step before any document leaves the firm, regardless of its destination.
What’s the difference between Clear All Formatting and removing a style in Word?
Clear All Formatting strips all direct formatting and resets text to Normal style. It removes everything, including intentional style assignments. Removing or replacing a style through Manage Styles replaces one style with another without touching the document’s other formatting layers. In legal documents built on style hierarchies, Clear All Formatting is destructive. Style replacement through Find & Replace or Manage Styles is targeted and non-destructive.
How do I find hidden tracked changes in a Word document?
Word’s Simple Markup and No Markup display modes hide tracked changes visually while leaving them in the file. Switch to All Markup (Review > Show Markup > All Markup) before running Document Inspector or accepting any changes. What looks like a clean document in Simple Markup may have dozens of embedded changes that haven’t been resolved.
How do I clean up Word document formatting without breaking the structure?
Use the Style Inspector to identify paragraphs with direct formatting overrides rather than clearing formatting globally. Replace rogue styles one at a time using Find & Replace with style criteria. After each style replacement, update the TOC and check that numbering has held its sequence. Making changes incrementally and verifying after each one is slower than a global clear but produces a document that holds together.
Master Microsoft Word for Legal Drafting
This is just one piece of the puzzle. Explore the Master Microsoft Word for legal drafting hub for all our Word resources for legal professionals.
MS Word Hub